Step-by-Step Guide to Contouring the Face
Contouring is a makeup technique that enhances or alters the structure of the face using different shades of makeup products. By using light and dark shades, you can create shadows, highlight certain areas, and accentuate your features. This step-by-step guide will walk you through the process of contouring your face for a sculpted and defined look.
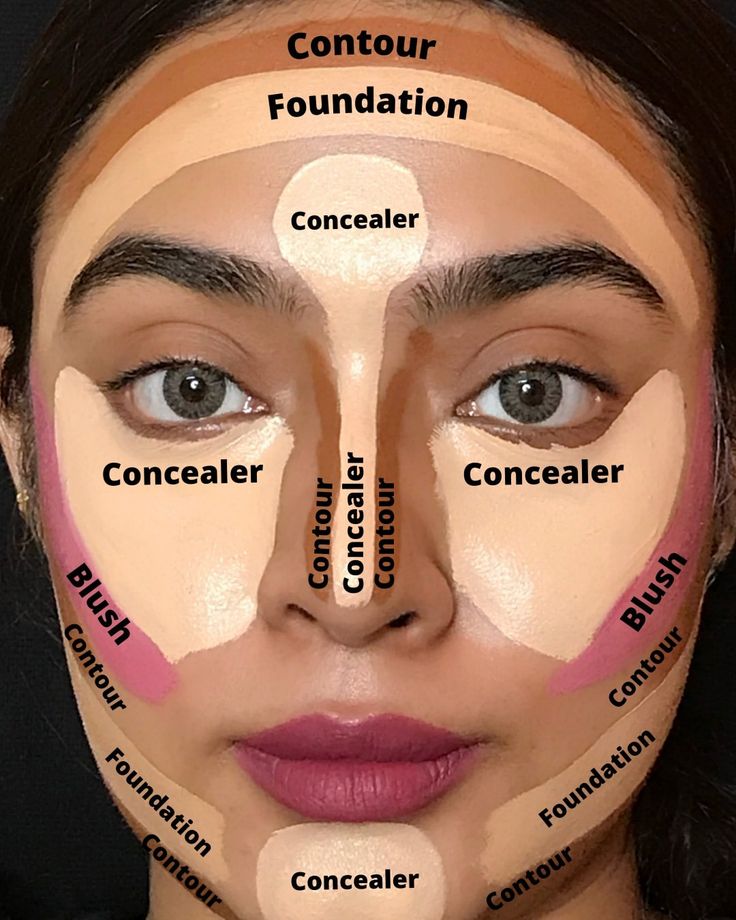
1. Prep Your Skin
Before applying any makeup, it’s essential to prepare your skin. Cleanse your face thoroughly and follow up with your skincare routine (moisturizer, sunscreen, etc.). Use a primer to create a smooth base, helping your makeup stay in place throughout the day.
Why it’s important: Contouring works best on a smooth, hydrated base, so prepping your skin ensures that the contour and highlight will blend seamlessly.
2. Apply Foundation
Choose a foundation that matches your skin tone and apply it evenly across your face. Use a makeup sponge, brush, or your fingers to blend it in well, ensuring that there are no streaks or harsh lines. This will create a uniform canvas for the contouring process.
Tip: Make sure to choose a foundation that isn’t too thick or cakey, as it can interfere with the contouring process.
3. Conceal and Highlight
Next, you’ll want to highlight certain areas of your face to bring them forward. Highlighting will brighten areas that naturally catch the light. Use a concealer or highlighter a few shades lighter than your skin tone for this step. Apply the highlighter to the following areas:
- Under your eyes (forming a triangle shape under each eye)
- Down the bridge of your nose
- On your forehead, just above your eyebrows
- On your chin
- On your cheekbones, the high points of your face
Blend these areas gently with a sponge or makeup brush, ensuring there are no sharp lines.
Tip: Be careful not to use too much product, as too much highlight can cause the face to look too shiny.
4. Contour with a Darker Shade
Contouring involves using a darker shade than your natural skin tone to create shadows, which helps to define your features. You’ll need a contour product (cream or powder) that’s about 2-3 shades darker than your skin tone.
Apply the contour to the following areas:
- Under your cheekbones: Suck in your cheeks, and apply contour in the hollows of your cheeks. Blend upward towards your ear for a natural look.
- Along your jawline: Apply contour along your jawline to sharpen and define it. Blend downward to avoid harsh lines.
- On your temples: Apply contour along your hairline at your temples to give the illusion of a more sculpted face.
- On the sides of your nose: If you want to slim your nose, apply a small line of contour along each side of your nose. Blend well to avoid any noticeable lines.
5. Blend the Contour
The key to a flawless contour is blending. Use a beauty sponge or makeup brush to blend the contour product into your skin. The goal is to have a natural, seamless look, with no harsh lines between your contour, highlight, and foundation.
Tip: Blend upward when contouring your cheeks, and downward when working on your jawline to maintain a lifting effect.
6. Set with Powder
To ensure that your contour lasts all day, set your makeup with translucent setting powder. Apply the powder to the areas you highlighted (under your eyes, nose, chin, and forehead) to lock in the brightness. Then, lightly dust the rest of your face with a translucent powder to ensure your contour and foundation stay in place.
Tip: If you used cream products for contouring, using a powder contour product can add depth and further define the face.
7. Apply Blush
Blush adds a healthy flush to the face and helps blend the contour into the rest of your makeup. Apply blush to the apples of your cheeks, blending it slightly upward to give the face a lifted, natural look. You can choose a blush that complements your skin tone and the overall look.
Tip: When applying blush, make sure to blend it into the contour to avoid harsh lines between the two products.
8. Final Touches
- Blend everything together: After applying contour, highlight, blush, and setting powder, make sure to blend everything once more for a flawless finish.
- Add Highlighter (optional): If you want extra glow, apply a highlighter on the tops of your cheekbones, the tip of your nose, and the inner corners of your eyes.
- Finish with setting spray: Lock your makeup in place with a setting spray to help it last all day long.
9. Review and Adjust
Once you’ve finished the contouring process, take a step back and look at your face in natural light. If any areas look too harsh or need more blending, go back in and make the necessary adjustments.
Tip: Contouring should enhance your natural features, not drastically change them. The goal is to make your face look more defined and sculpted without overdoing it.
Conclusion
Contouring is a technique that takes practice, but with these steps, you’ll be able to sculpt and highlight your features for a more defined, chiseled look. Remember, the key is blending, blending, blending—always ensure that the contour and highlight seamlessly merge into your skin for the most natural result. With the right tools and techniques, you can achieve a flawless, contoured face.